8 Essential Meal Prep Tools Every Beginner Needs
Why You Need the Right Meal Prep Tools (and Why You Don’t Need Everything)
You don’t need a kitchen full of gadgets to meal-prep successfully. But you do need the right few tools—ones that save time, reduce waste, and make cooking in batches actually sustainable. The difference between someone who preps once and quits versus someone who builds a lasting habit often comes down to having equipment that works with you, not against you. A good container system, a reliable scale, and a few sharp knives will outperform a drawer full of single-purpose gadgets every time.
This guide covers eight essential meal prep tools that earn their shelf space. We’re talking about items that directly reduce prep time, improve food safety, or make storage so seamless you’ll actually stick with the system. Most of these are under $15 each, and the entire starter set comes in well under $100.
How We Chose These Meal Prep Essentials
We prioritized tools that solve real problems beginners face: uneven chopping, inconsistent portions, food spoiling mid-week, and containers that don’t seal properly. Each item had to meet three criteria:
- Durability: Will it last through dozens of meal-prep cycles without warping, cracking, or losing function?
- Actual time savings: Does it measurably reduce prep time or improve consistency?
- Affordability: Quality doesn’t require spending $50 on a single tool.
We excluded items like food processors (nice-to-have, not essential), vacuum sealers (overkill for most beginners), and branded meal-prep “systems” that charge premium prices for basic containers. Instead, we focused on versatile, affordable, foundational equipment that works across different meal-prep styles—whether you’re prepping proteins, vegetables, grains, or mixed bowls.
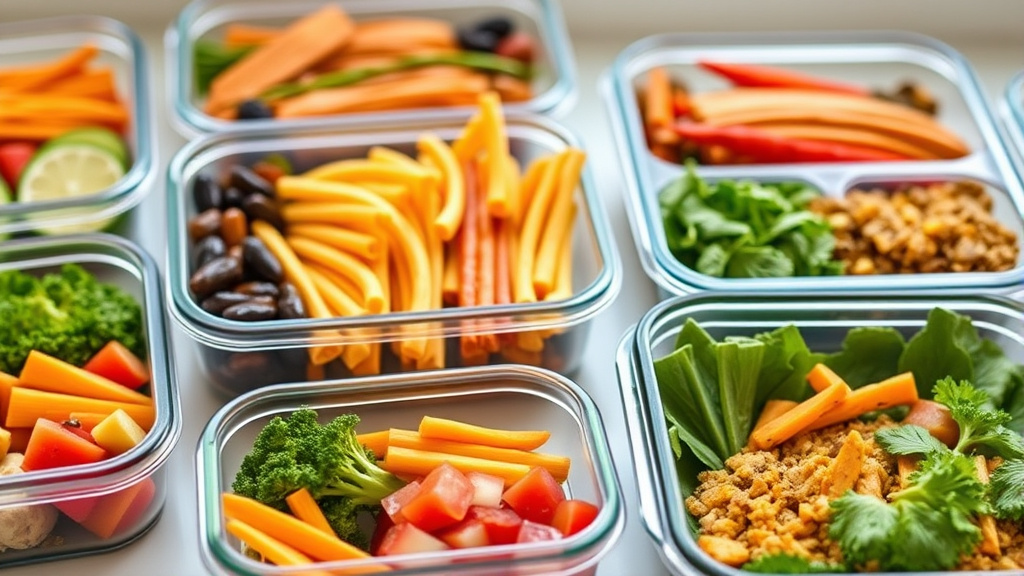
The Foundation: Meal Prep Containers
Your container system is the backbone of meal prep. It determines whether your prepped food stays fresh, whether you can actually fit everything in your fridge, and whether you’ll use your prep work or watch it spoil.
Look for containers that are:
- Airtight: Silicone seals or locking lids that actually seal, not just snap on.
- Stackable: Rectangular containers stack better than round ones and take up less fridge space.
- Freezer-safe: You’ll want to freeze portions for later weeks.
- Microwave-safe: Most beginners reheat in the microwave; avoid containers with non-removable lids that trap steam.
- Durable: Glass or BPA-free plastic that won’t warp after 50+ wash cycles.
A starter set of six 32–40 oz containers (roughly 1000 mL) handles most single-person meal-prep weeks. If you’re prepping for two people, go with eight. Avoid buying a massive set of 20+ containers; you’ll end up with empties taking up space, and older containers degrade faster than you can use them.
The Workhorse: A Sharp Chef’s Knife
You’ll spend 30–40% of your meal-prep time chopping. A dull knife turns this into a frustrating, dangerous slog. A sharp 8-inch chef’s knife—the right size for most home cooks—cuts through onions, peppers, chicken, and carrots with minimal effort and maximum control.
You don’t need a $100 knife. A mid-range stainless-steel chef’s knife (8-inch, around $20–30) will outperform a cheap set of six dull knives. Look for one with a comfortable grip and decent weight balance. Sharpen it every 3–4 months if you’re prepping weekly; a honing steel ($8–12) maintains the edge between sharpenings.
Pair your chef’s knife with a cutting board that won’t dull the blade. A wooden or composite board is better than glass or marble. Size matters: a 12×18-inch board gives you room to work without vegetables rolling off.
Precision and Consistency: A Digital Kitchen Scale
Meal prep is about consistency—eating roughly the same portions each day so you can track nutrition and avoid surprises. A digital kitchen scale removes guesswork and ensures your “200g of chicken” is actually 200g, not 180g or 240g.
A basic digital scale (±1g accuracy, up to 5 kg capacity) costs $12–20. Look for one with a tare button (zeros the weight so you can measure multiple ingredients in the same bowl) and a display large enough to read without squinting. Stainless-steel or plastic platforms are fine; just avoid scales with overly complicated interfaces.
If you’re meal-prepping for weight loss or muscle gain, a scale is non-negotiable. Even if you’re just prepping for convenience, it eliminates the “is this portion too big?” debate and makes your meal prep reproducible week to week.
Organization and Portion Control: Measuring Cups and Spoons
While a scale is ideal for precision, measuring cups and spoons are faster for quick volume-based portions (especially grains and liquids) and cost almost nothing. A set of stainless-steel or plastic measuring cups ($5–8) and spoons ($3–5) should include:
- Cups: 1/4, 1/3, 1/2, 1, and 2 cup measures.
- Spoons: 1/4, 1/2, 1 teaspoon and 1 tablespoon.
Stainless steel lasts longer and doesn’t stain or retain odors. Nesting sets save drawer space. You’ll use these constantly—for portioning cooked grains, sauces, and pre-measured ingredients.
Speed and Safety: A Vegetable Prep Tool
A mandoline or vegetable peeler isn’t strictly essential, but it dramatically speeds up certain tasks. A mandoline (a flat tool with an adjustable blade) slices vegetables paper-thin in seconds—perfect for prepping large batches of zucchini, cucumber, or carrots. A good one costs $15–25 and includes a hand guard to protect your fingers.
Alternatively, a Y-shaped vegetable peeler ($3–5) is safer for beginners and handles carrots, cucumbers, and potatoes efficiently. If you’re prepping large quantities of raw vegetables, either tool pays for itself in time saved within a few weeks.
Storage and Freshness: Food Storage Labels and Freezer Markers
You’ll prep on Sunday and eat on Wednesday. Without labels, you’ll forget what’s in each container, when you prepped it, and whether it’s still safe to eat. A pack of freezer-safe labels ($4–6) and a permanent marker ($1–2) are cheap insurance against food waste.
Write the contents and the date on each container before storing. This takes 30 seconds per container and prevents the “is this chicken from last week or this week?” mystery. If you’re freezing portions, labels are essential—frozen food is harder to identify by sight, and you need to know how long it’s been frozen.
Alternatively, use painter’s tape and a permanent marker (even cheaper) or a label maker if you’re prepping for multiple people and want to add names.
Optional but Useful: Prep Bowls and a Colander
Small prep bowls (1–2 cup capacity, set of 3–4) are invaluable for organizing ingredients before cooking. Instead of reaching for individual ingredients during cooking, you prep them into small bowls first—a technique called mise en place. This reduces stress, prevents forgotten ingredients, and makes cooking faster. A set of glass prep bowls costs $10–15.
A colander (a bowl with drainage holes) is essential if you’re prepping grains or rinsing vegetables. A basic stainless-steel or plastic colander costs $6–10. It drains pasta, quinoa, and rice in seconds and doubles as a strainer for canned beans.
Building Your Beginner Meal Prep Kit: The Complete Checklist
Here’s what a complete starter kit looks like:
| Item | Estimated Cost | Quantity | Notes |
|---|---|---|---|
| Airtight containers (32–40 oz) | $20–30 | 6–8 | Glass or BPA-free plastic |
| Chef’s knife (8-inch) | $20–30 | 1 | Sharp, comfortable grip |
| Cutting board | $10–15 | 1 | Wood or composite, 12×18” |
| Digital kitchen scale | $12–20 | 1 | Tare button, 5 kg capacity |
| Measuring cups and spoons | $8–12 | 1 set | Stainless steel |
| Vegetable peeler or mandoline | $5–25 | 1 | Depends on choice |
| Labels and marker | $5–8 | 1 | Freezer-safe |
| Prep bowls (optional) | $10–15 | 1 set | Glass, 1–2 cup capacity |
| Total | $90–155 | — | Aim for the lower end as a beginner |
Start with the first five items (containers, knife, cutting board, scale, measuring cups). These are non-negotiable. Add the vegetable peeler, labels, and prep bowls as you settle into a routine. A colander is only essential if you’re cooking grains or rinsing vegetables regularly.
What You Don’t Need (Yet)
Avoid these common beginner traps:
- Branded meal-prep containers: Fancy branded systems cost 2–3× more for the same functionality.
- Slow cookers or instant pots: Great tools, but not essential for basic meal prep. Master knife skills and stovetop cooking first.
- Food processors: Nice for large batches, but a sharp knife is faster for most beginners and takes up less space.
- Vacuum sealers: Overkill unless you’re prepping for 2+ weeks at a time. Airtight containers work fine.
- Specialized gadgets: Spiralizers, garlic choppers, and egg slicers are solutions looking for problems. A knife does all of these.
Caring for Your Meal Prep Tools
Your tools will last years if you maintain them:
- Containers: Hand-wash lids (dishwasher can degrade seals) and air-dry. Store with lids off to prevent odor trapping.
- Knives: Hand-wash immediately after use (dishwashers dull blades). Store in a knife block or on a magnetic strip, never loose in a drawer.
- Scale: Wipe clean with a damp cloth; avoid soaking. Replace batteries annually.
- Cutting board: Sanitize weekly with hot soapy water or a bleach solution (1 tablespoon per gallon). Oil wooden boards monthly to prevent cracking.
Real-World Meal Prep Workflow
Here’s how these tools work together in practice:
Sunday, 2 PM: You’ve bought 2 lbs of chicken breasts, 3 lbs of mixed vegetables, and 2 cups of dry rice.
- Prep: Use your chef’s knife and cutting board to chop vegetables into uniform pieces (10 minutes). Rinse rice in the colander.
- Measure: Use measuring cups to portion rice (2 cups dry = roughly 6 cups cooked, enough for 6 servings). Weigh chicken on the scale (8 oz per portion × 3 portions = 24 oz total).
- Cook: Roast vegetables and chicken, cook rice (40 minutes total).
- Portion: Use measuring cups to portion grains, the scale to verify protein portions, and prep bowls to organize components before dividing into containers.
- Label: Write “Chicken, roasted veg, rice — 1/25” on each container with a permanent marker.
- Store: Stack containers in the fridge. Freeze 2–3 portions if you won’t eat them within 4 days.
Total time: 60 minutes. Total cost of ingredients: $12–15. Cost per meal: $2–2.50. Your meal-prep tools paid for themselves in one week.
Scaling Up: When to Add More Tools
After 4–8 weeks of consistent meal prep, you’ll know what you actually need. At that point, consider:
- A second cutting board: Dedicated boards for raw meat and vegetables prevent cross-contamination and speed up prep.
- A larger scale: If you’re prepping for 2+ people, a 10 kg capacity scale is more convenient.
- Additional containers: As you find your rhythm, you might want 12–16 containers instead of 6–8.
- A honing steel: Maintain your knife’s edge between professional sharpenings.
- Freezer bags: For freezing individual portions of soups, sauces, or marinated proteins.
Don’t buy these upfront. Let your actual workflow tell you what’s missing.
Budget Breakdown: Where to Spend and Where to Save
Worth the money:
- A quality chef’s knife ($25–30): You’ll use it hundreds of times.
- Airtight containers ($25–35 for a set of 6–8): Food safety and fridge space depend on this.
- A digital scale ($15–20): Precision pays off in consistency and nutrition tracking.
Save money:
- Measuring cups and spoons ($8–12 for a set): Basic is fine; you’re not competing on aesthetics.
- Labels and markers ($5–8): Cheapest way to prevent food waste.
- Prep bowls ($10–15): Glass is durable and affordable; avoid fancy branded sets.
Skip entirely:
- Specialized containers with built-in dividers: Regular containers + your own arrangement is cheaper and more flexible.
- Branded “meal-prep systems”: You’re paying for marketing, not functionality.
Troubleshooting Common Beginner Issues
Problem: Containers don’t seal properly, and food spoils mid-week.
Solution: Check that the silicone gasket (the rubber ring) is seated correctly. If containers are old (2+ years), the seals degrade. Replace them. Store containers upright, not stacked, until the seal is proven reliable.
Problem: Chopping takes forever, and vegetables are inconsistent sizes.
Solution: Sharpen your knife (or get a new one if it’s beyond saving). Practice a consistent cutting motion. Watch a 3-minute YouTube video on proper chef’s knife technique. A sharp knife and good technique cut prep time in half.
Problem: You forget what’s in each container and waste food.
Solution: Label everything immediately after cooking. Use a permanent marker and freezer-safe labels. Write the date and contents. Check your fridge every 3 days and eat the oldest containers first.
Problem: You run out of containers mid-week.
Solution: Start with 8 containers, not 6. Or, prep smaller portions so one batch lasts 5 days instead of 4. Or, wash and reuse containers mid-week (if you have time).
The Bigger Picture: Tools Support Habits, Not the Reverse
The best meal-prep tool is the one that removes friction between “I want to meal-prep” and “I actually meal-prepped.” For most beginners, that means:
- Containers that stack neatly so you’re not playing Tetris with your fridge.
- A sharp knife so chopping doesn’t feel like punishment.
- A scale so you know your portions are consistent.
- Labels so you’re not playing Russian roulette with old food.
These eight essentials cost under $100 and cover 95% of what you’ll actually need. The remaining 5%—specialized tools, gadgets, and upgrades—can wait until you’ve built a meal-prep habit. Start simple. Use what you have. Add tools as your workflow reveals what’s actually missing. That’s how you build a sustainable meal-prep practice that lasts years, not weeks.
Our top picks
| Pick | Best for | |
|---|---|---|
| Rubbermaid Brilliance Airtight Food Storage Containers | Beginners who want reliable, stackable containers that seal well and last years without warping or staining. | Find on Amazon → |
| Victorinox Fibrox Chef's Knife (8-inch) | Anyone serious about meal prep who wants a sharp, durable knife that won't break the bank and handles 90% of prep tasks. | Find on Amazon → |
| Etekcity Digital Kitchen Scale (5 kg capacity) | Meal preppers tracking portions, calories, or macros; anyone who wants consistency and reproducibility week to week. | Find on Amazon → |
| OXO Good Grips Measuring Cups and Spoons Set | Beginners who need fast, volume-based portioning for grains, liquids, and sauces without weighing everything. | Find on Amazon → |
| Mercer Culinary Y-Peeler or Mandoline Slicer | Meal preppers who regularly prep large batches of vegetables and want to save 10–15 minutes per session. | Find on Amazon → |
| Pyrex Glass Prep Bowls (3-piece set, 1–2 cup capacity) | Meal preppers who want to organize ingredients before cooking (mise en place) and avoid reaching for individual items during cooking. | Find on Amazon → |
| Oxo Good Grips Stainless Steel Colander | Meal preppers cooking grains, rinsing vegetables, or draining canned beans regularly. | Find on Amazon → |
| Avery Freezer Labels and Permanent Markers | Anyone prepping food and storing it for more than 2 days; essential for preventing food waste and knowing what's in each container. | Find on Amazon → |
Rubbermaid Brilliance Airtight Food Storage Containers
Best for:Beginners who want reliable, stackable containers that seal well and last years without warping or staining.
Airtight lids actually seal, containers stack neatly, and they're freezer- and microwave-safe. The set of 6 (32 oz each) is the right starting size for one person. Lasts 5+ years with proper care.
- Airtight seals prevent spoilage mid-week
- Stackable design maximizes fridge space
- Freezer- and microwave-safe
- Affordable ($25–30 for 6 containers)
- Lids can be removed for microwave reheating
- Plastic can stain with tomato-based foods over time
- Lids need hand-washing to preserve seals
Victorinox Fibrox Chef's Knife (8-inch)
Best for:Anyone serious about meal prep who wants a sharp, durable knife that won't break the bank and handles 90% of prep tasks.
Victorinox is the professional standard: sharp out of the box, comfortable grip, and lasts years. 8-inch is the ideal size for most home cooks. At $25–35, it outperforms cheap 6-piece knife sets by a factor of 10.
- Sharp and stays sharp longer than budget knives
- Comfortable, non-slip handle
- Lightweight and well-balanced
- Affordable for the quality
- Professional-grade durability
- Requires hand-washing (dishwasher dulls the blade)
- Needs sharpening every 3–4 months if used weekly
Etekcity Digital Kitchen Scale (5 kg capacity)
Best for:Meal preppers tracking portions, calories, or macros; anyone who wants consistency and reproducibility week to week.
Accurate to ±1g, has a tare button (zeros the scale so you can measure multiple ingredients in one bowl), and displays clearly. At $12–18, it's the most affordable way to remove guesswork from portions.
- Accurate to ±1g for precise portions
- Tare button for multi-ingredient measuring
- Large, easy-to-read display
- Compact and fits on most counters
- Affordable
- Requires AAA batteries (replace annually)
- Not ideal for measuring liquids (use measuring cups instead)
OXO Good Grips Measuring Cups and Spoons Set
Best for:Beginners who need fast, volume-based portioning for grains, liquids, and sauces without weighing everything.
Stainless steel is durable and doesn't stain or retain odors. Nesting design saves drawer space. Clear measurements and comfortable handles. At $8–12 for a complete set, it's the fastest way to portion grains and liquids.
- Stainless steel lasts years without staining
- Nesting design saves space
- Comfortable, ergonomic handles
- Clear, easy-to-read measurements
- Affordable
- Less precise than a scale (volume varies by how tightly you pack)
- Not ideal for very small measurements (use a scale instead)
Mercer Culinary Y-Peeler or Mandoline Slicer
Best for:Meal preppers who regularly prep large batches of vegetables and want to save 10–15 minutes per session.
A Y-peeler ($3–5) is safer for beginners and handles carrots, cucumbers, and potatoes quickly. A mandoline ($15–25) is faster for slicing vegetables paper-thin (zucchini, cucumber, beets). Choose based on what vegetables you prep most.
- Dramatically speeds up vegetable prep
- Mandoline creates uniform slices for consistent cooking
- Y-peeler is safe and requires no learning curve
- Both are affordable
- Durable and long-lasting
- Mandoline has a learning curve and requires a hand guard to avoid cuts
- Y-peeler is slower than a mandoline for large batches
Pyrex Glass Prep Bowls (3-piece set, 1–2 cup capacity)
Best for:Meal preppers who want to organize ingredients before cooking (mise en place) and avoid reaching for individual items during cooking.
Glass is durable, doesn't stain or retain odors, and lasts years. A 3-piece set (1, 1.5, and 2 cup) covers most prep needs. At $10–15, it's cheaper than plastic and more professional.
- Glass is durable and doesn't stain
- Microwave- and oven-safe
- Transparent so you can see contents
- Affordable for the quality
- Doubles as serving bowls
- Heavier than plastic
- Can break if dropped
Oxo Good Grips Stainless Steel Colander
Best for:Meal preppers cooking grains, rinsing vegetables, or draining canned beans regularly.
Stainless steel is durable and doesn't rust. Handles up to 5 quarts and drains quickly. At $8–12, it's the cheapest way to add a dedicated grain-draining tool to your kit.
- Stainless steel lasts years
- Handles large batches of grains or vegetables
- Comfortable, non-slip handles
- Affordable
- Doubles as a strainer for canned beans
- Takes up cabinet space (not as compact as measuring cups)
- Overkill if you're not cooking grains regularly
Avery Freezer Labels and Permanent Markers
Best for:Anyone prepping food and storing it for more than 2 days; essential for preventing food waste and knowing what's in each container.
Freezer-safe labels stick to containers and don't fade. Permanent markers write clearly on labels and tape. Together, they cost $5–8 and prevent the "is this from last week?" mystery that leads to throwing away good food.
- Freezer-safe labels don't peel off in cold
- Permanent marker writes clearly and lasts
- Affordable
- Takes 30 seconds per container
- Prevents food waste
- Labels can be hard to remove from containers (use rubbing alcohol)
- Requires manual writing (slower than a label maker, but cheaper)
Frequently asked questions
Do I really need a digital kitchen scale for meal prep?
If you're tracking calories, macros, or portion sizes for fitness goals, yes—a scale removes guesswork and ensures consistency. If you're prepping purely for convenience and don't care about exact portions, measuring cups work fine. But a basic scale costs $12–20 and makes your meal prep reproducible week to week, so it's worth the investment.
What's the best material for meal prep containers—glass or plastic?
Both work. Glass is more durable, doesn't stain or retain odors, and lasts 5+ years. Plastic (BPA-free) is lighter, cheaper, and less likely to shatter. Choose glass if you reheat in containers often; choose plastic if you're on a tight budget or value portability. Either way, prioritize airtight seals over material.
How many containers do I need to start meal prepping?
Start with 6–8 containers (32–40 oz each) for one person prepping one week. This gives you 6–8 meals plus flexibility for snacks or freezing extras. If you're prepping for two people, go with 12–16. You can always wash and reuse mid-week, but having enough containers reduces stress and makes the system feel sustainable.
Can I use regular plastic containers instead of buying a meal-prep set?
Yes. Takeout containers, deli containers, or any food-safe container with a tight-fitting lid works. The downside is they're usually not stackable, don't seal as reliably, and degrade faster. A proper meal-prep container set costs $25–35 for 6–8 and lasts years. It's worth the small upfront investment.
What's the difference between a chef's knife and a paring knife for meal prep?
A chef's knife (8-inch) handles 90% of meal-prep tasks: chopping vegetables, slicing meat, mincing herbs. A paring knife (3–4 inch) is for detail work—peeling, deveining shrimp, or trimming. Start with one sharp chef's knife. Add a paring knife later if you find yourself doing fine detail work regularly.
How often should I sharpen my meal-prep knife?
If you're prepping weekly, sharpen every 3–4 months. Between sharpenings, use a honing steel (costs $8–12) to maintain the edge—this takes 30 seconds and keeps the knife sharp. A professional sharpening costs $5–10 and takes 1–2 weeks. Learn to hone at home and sharpen professionally once or twice a year.